
There are times when you do not want everything living on the OS disk of your Azure Linux VM.
Maybe you are hosting websites, storing application files, moving Docker data, keeping backups, or just trying to avoid filling up /.
This guide walks through attaching a new Azure data disk to a Linux VM and mounting it as:
/web
The example is based on a real exercise using:
Azure VM name:       linuxdevapp
New disk name:       web
Disk size:           250 GiB
Linux disk device:   /dev/sdc
Linux partition:     /dev/sdc1
Mount point:         /web
Filesystem:          xfs
Microsoft Learn explains the official process for attaching a disk in the Azure portal, connecting to the VM, finding the disk with lsblk, preparing the disk, mounting it, and adding it to /etc/fstab. This guide follows that flow, but keeps it focused on the shortest working path with real checks and beginner-friendly warnings. See Microsoft’s guide to attach a data disk to a Linux VM.
What we are building
By the end, the VM will have a new data disk mounted like this:
/dev/sdc1 250G /web
That means /web will live on the new 250 GiB Azure data disk instead of the OS disk.
Reusable placeholders:
[VM_NAME]       = linuxdevapp
[DISK_NAME]     = web
[DISK_DEVICE]   = /dev/sdc
[PARTITION]     = /dev/sdc1
[MOUNT_POINT]   = /web
[FILESYSTEM]    = xfs
[UUID]          = your UUID from blkid
Step 1 - Create and attach the disk in Azure
In the Azure Portal, open your VM:
Virtual Machines > linuxdevapp > Disks
Under Data disks, choose:
Create and attach a new disk
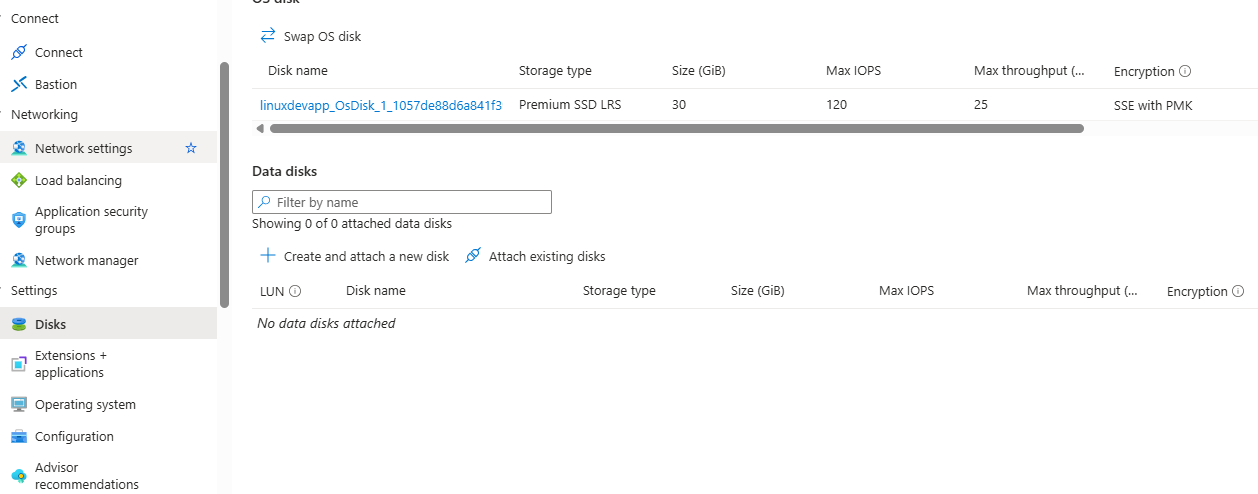
For this example, the disk settings were:
LUN:          1
Disk name:    web
Storage type: Standard SSD LRS
Size:         250 GiB
Encryption:   Platform-managed
Then select Save.
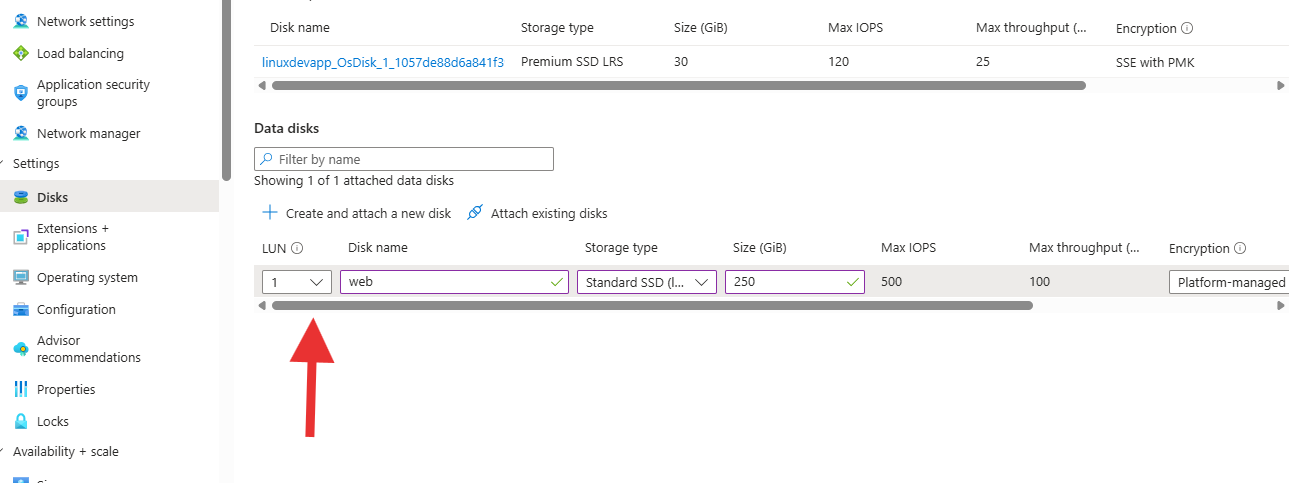
web, uses LUN 1, and is set to 250 GiB.Azure attaches the disk to the VM, but Linux still needs to partition, format and mount it before the disk can be used.
Step 2 - SSH into the Linux VM
Connect to the VM:
ssh [USERNAME]@[VM_PUBLIC_IP]
Example:
ssh ltavares@[VM_PUBLIC_IP]
After logging in, your prompt may look like this:
ltavares@linuxdevapp:~$
Replace:
[USERNAME]     = your Linux username
[VM_PUBLIC_IP] = your Azure VM public IP address
Step 3 - List the disks
Run:
lsblk -o NAME,HCTL,SIZE,FSTYPE,MOUNTPOINT | grep -i "sd"
In this exercise, the output was:
sda     0:0:0:0      30G
|-sda1             29.9G ext4   /
|-sda14               4M
`-sda15             106M vfat   /boot/efi
sdb     0:0:0:1      16G
`-sdb1               16G ext4   /mnt
sdc     1:0:0:1     250G
The important part is:
sda = OS disk
sdb = Azure temporary/resource disk mounted at /mnt
sdc = new 250G data disk
So in this VM, the new disk is:
/dev/sdc
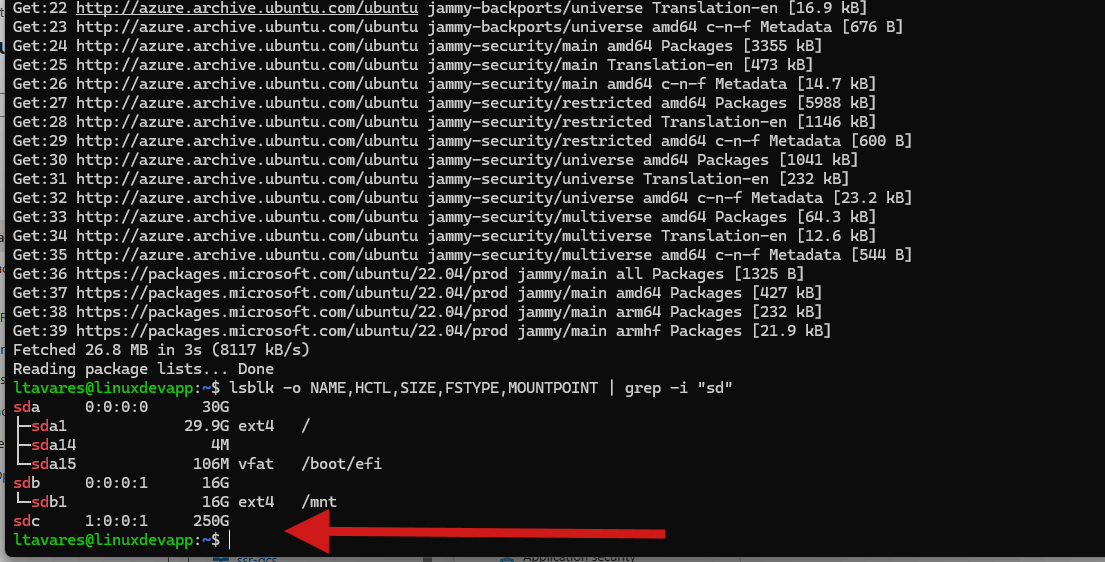
/dev/sdc, with the 250G size matching the disk created in Azure.Do not format /dev/sda. That is the OS disk. Do not use /dev/sdb in this example either, because it is the temporary/resource disk.
Pro tip - Match Azure LUN to Linux HCTL
This is one of the most useful safety checks.
In Azure, the disk was attached using:
LUN: 1
In Linux, the lsblk output showed:
sdc 1:0:0:1 250G
The HCTL value is:
1:0:0:1
The last number is the LUN.
Azure LUN:         1
Linux HCTL ends:   1
That confirms /dev/sdc is the disk attached in Azure.
This matters when you have multiple disks of the same size. Your new disk may not always be /dev/sdc; on another VM it could be /dev/sdd, /dev/sde, or something else depending on how many disks are attached. That is one reason we later use the UUID in /etc/fstab instead of relying only on the device name.
Step 4 - Partition the new disk
Create a GPT partition table and one full-size partition:
sudo parted /dev/sdc --script mklabel gpt mkpart primary xfs 0% 100%
Then check again:
lsblk -o NAME,HCTL,SIZE,FSTYPE,MOUNTPOINT | grep -i "sd"
You should now see:
sdc     1:0:0:1     250G
`-sdc1              250G
The new partition is:
/dev/sdc1
Only run this on a new empty disk. Partitioning and formatting the wrong disk can destroy data.
Step 5 - Format the partition
Format the new partition as XFS:
sudo mkfs.xfs /dev/sdc1
You should see output similar to:
meta-data=/dev/sdc1              isize=512    agcount=4
data     =                       bsize=4096
naming   =version 2              bsize=4096
log      =internal log           bsize=4096
Discarding blocks...Done.
The partition is now formatted and ready to mount.
This guide uses XFS. If you prefer or require ext4, replace:
sudo mkfs.xfs /dev/sdc1
With:
sudo mkfs.ext4 /dev/sdc1
Later, in /etc/fstab, make sure the filesystem is also set to ext4. The filesystem in /etc/fstab must match the filesystem you actually created.
Step 6 - Refresh the partition table
Run:
sudo partprobe /dev/sdc
This helps Linux detect the new partition and filesystem immediately. It can also prevent commands such as blkid or lsblk from failing to return the new filesystem UUID straight away.
Step 7 - Create the mount folder
Create the folder where the disk will be mounted.
For this exercise:
/web
Run:
sudo mkdir /web
This creates the mount point.
Step 8 - Mount the disk
Mount the new partition to /web:
sudo mount /dev/sdc1 /web/
Now check the mounted filesystems:
df -h
In this exercise, the output showed:
Filesystem      Size  Used Avail Use% Mounted on
/dev/root        29G  2.8G   27G  10% /
/dev/sda15      105M  6.1M   99M   6% /boot/efi
/dev/sdb1        16G   28K   15G   1% /mnt
/dev/sdc1       250G  1.8G  249G   1% /web
The important line is:
/dev/sdc1 250G 1.8G 249G 1% /web
That confirms the disk is mounted correctly.
Step 9 - Fix folder permissions
Because /web was created with sudo, the folder is owned by root.
That means if you try to upload files with SFTP, create folders, or write files as your normal Linux user, you may get:
Permission denied
To let your current user write to /web, run:
sudo chown -R $USER:$USER /web
Then test it:
touch /web/test-file.txt
ls -l /web
rm /web/test-file.txt
If the touch command works, your user can write to the new disk.
For a multi-user server, a group-based permission model may be better than assigning ownership to one user. For a simple single-admin VM, chown -R $USER:$USER /web is the quickest fix.
Step 10 - Get the UUID
The disk is mounted now, but it should mount automatically after reboot.
For that, get the UUID:
sudo blkid /dev/sdc1
In this exercise, the output was:
/dev/sdc1: UUID="e69cb425-b656-437b-b56b-0da8673a914c" BLOCK_SIZE="4096" TYPE="xfs" PARTLABEL="primary" PARTUUID="707cf87d-ed18-4cf1-9127-df4411b349d2"
The UUID is:
e69cb425-b656-437b-b56b-0da8673a914c
Use the UUID, not the PARTUUID.
Microsoft recommends using the UUID in /etc/fstab rather than only using a device name such as /dev/sdc1, because device names can change and the wrong disk could otherwise be mounted to the wrong location.
Step 11 - Back up fstab
Before editing /etc/fstab, create a backup:
sudo cp /etc/fstab /etc/fstab.bak
This matters because a bad /etc/fstab entry can make the system fail to boot correctly.
Step 12 - Edit fstab
Open /etc/fstab:
sudo vim /etc/fstab
Or use nano:
sudo nano /etc/fstab
Add this line at the bottom:
UUID=e69cb425-b656-437b-b56b-0da8673a914c /web xfs defaults,nofail 1 2
Reusable format:
UUID=[UUID] [MOUNT_POINT] [FILESYSTEM] defaults,nofail 1 2
For this exercise:
[UUID]         = e69cb425-b656-437b-b56b-0da8673a914c
[MOUNT_POINT]  = /web
[FILESYSTEM]   = xfs
So the final line is:
UUID=e69cb425-b656-437b-b56b-0da8673a914c /web xfs defaults,nofail 1 2
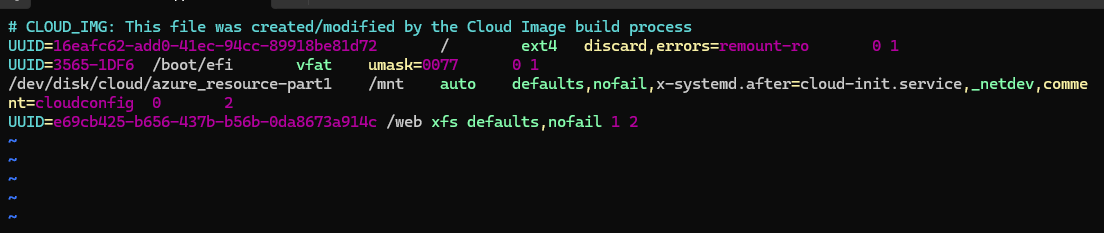
/etc/fstab entry mounts the disk by UUID at /web with nofail.The nofail option is important. It allows the VM to continue booting even if this data disk is missing or fails to mount.
If you make a typo in /etc/fstab and forget nofail, an Azure Linux VM may hang or enter a failed boot state. Microsoft troubleshooting guidance recommends running mount -a after editing /etc/fstab, using nofail for data disks, and using Azure Serial Console when an fstab boot issue occurs. See Microsoft’s guide to troubleshooting Linux VM boot issues caused by fstab errors.
Step 13 - Test fstab
Before rebooting, test the configuration.
Unmount /web:
sudo umount /web
Mount everything from /etc/fstab:
sudo mount -a
Now check that /web came back:
df -h | grep web
Expected output:
/dev/sdc1 250G 1.8G 249G 1% /web
If there is no error from sudo mount -a and /web appears again, your /etc/fstab entry works.
Step 14 - Optional reboot test
To fully confirm everything works after reboot:
sudo reboot
Reconnect:
ssh ltavares@[VM_PUBLIC_IP]
Check the mount again:
df -h | grep web
Expected result:
/dev/sdc1 250G 1.8G 249G 1% /web
If /web appears after reboot, the disk is mounted automatically and ready to use.
Full command list from this exercise
Here is the complete command sequence:
lsblk -o NAME,HCTL,SIZE,FSTYPE,MOUNTPOINT | grep -i "sd"

sudo parted /dev/sdc --script mklabel gpt mkpart primary xfs 0% 100%

lsblk -o NAME,HCTL,SIZE,FSTYPE,MOUNTPOINT | grep -i "sd"

sudo mkfs.xfs /dev/sdc1

sudo partprobe /dev/sdc

sudo mkdir /web

sudo mount /dev/sdc1 /web/

df -h

sudo chown -R $USER:$USER /web

touch /web/test-file.txt
ls -l /web
rm /web/test-file.txt

sudo blkid /dev/sdc1

sudo cp /etc/fstab /etc/fstab.bak

sudo vim /etc/fstab
Add this line to /etc/fstab:
UUID=e69cb425-b656-437b-b56b-0da8673a914c /web xfs defaults,nofail 1 2
Then test:
sudo umount /web

sudo mount -a

df -h | grep web
Reusable template
Use this version on another VM.
First, find the new disk:
lsblk -o NAME,HCTL,SIZE,FSTYPE,MOUNTPOINT | grep -i "sd"
Then replace these placeholders:
[DISK_DEVICE] = /dev/sdc
[PARTITION]   = /dev/sdc1
[MOUNT_POINT] = /web
[FILESYSTEM]  = xfs
[UUID]        = UUID from blkid
Reusable command template:
sudo parted [DISK_DEVICE] --script mklabel gpt mkpart primary [FILESYSTEM] 0% 100%

sudo mkfs.xfs [PARTITION]

sudo partprobe [DISK_DEVICE]

sudo mkdir [MOUNT_POINT]

sudo mount [PARTITION] [MOUNT_POINT]/

df -h

sudo chown -R $USER:$USER [MOUNT_POINT]

sudo blkid [PARTITION]

sudo cp /etc/fstab /etc/fstab.bak

sudo vim /etc/fstab
Reusable /etc/fstab line:
UUID=[UUID] [MOUNT_POINT] [FILESYSTEM] defaults,nofail 1 2
For ext4, use:
sudo mkfs.ext4 [PARTITION]
And in /etc/fstab:
UUID=[UUID] [MOUNT_POINT] ext4 defaults,nofail 1 2
Quick troubleshooting
If the new disk does not appear, confirm the disk is attached in the Azure Portal and that you selected Save after creating it.
If you are not sure which disk is the new one, compare the Azure disk size and LUN with the Linux lsblk output. In this exercise, Azure showed LUN 1, and Linux showed /dev/sdc with HCTL 1:0:0:1, where the last number is also 1.
If blkid does not show the UUID, run:
sudo partprobe /dev/sdc
Then try again:
sudo blkid /dev/sdc1
If you get Permission denied when writing to /web, fix ownership:
sudo chown -R $USER:$USER /web
If sudo mount -a fails, recheck the /etc/fstab line carefully:
UUID must match blkid
Mount point must exist
Filesystem must be correct: xfs or ext4
nofail should be present
Final result
The Azure disk named web is now attached to the VM linuxdevapp.
Inside Linux, it is available as:
/dev/sdc1
And mounted at:
/web
The VM now has a separate 250 GiB disk ready for website files, app data, Docker volumes, backups, or anything else you do not want stored on the OS disk.